Circles and Curves Shoot 2
Plans for shoot
Take photos of a model with circles drawn on any skin that is on show in the images. To leave more negative space so that my images can also include a polka dot background and a wider variety of colours.
Take photos of a model with circles drawn on any skin that is on show in the images. To leave more negative space so that my images can also include a polka dot background and a wider variety of colours.
Research influence
Yayoi Kusama
Yayoi Kusama
Image Bank


Contact Sheets


My Best images (target 4 - 6)


Images that require improvement


 For the image above I have mainly focused on getting the shapes and positioning of the circles to look better and more interesting. I used the same method to do this, however I also made the circles on the models face better. I did this by using the healing brush to remove any unwanted marks and then using the soft paint brush tool with a low opacity to fill in and shape any odd circles. Below is a screen capture of the layers I used for each colour of circle.

Progression: To progress further in circles and curves I am going to experiment using circles to create an image. Maybe trying to create a deeper meaning into my images.
Contact Sheets


My Best images (target 4 - 6)


Images that require improvement

I have selected this image because of the poor lighting in the image. The model was not placed correctly and the camera was not set correctly, therefore the image is too bright and the model has unwanted shadows on her face.

I have selected this image because the model in this photo was not ready for the image to be taken, and therefore the composition is poor and the image is blurry.


I have selected the two images above because the camera was not in focus for either of these shots and therefore the image is blurry. However the model is centred quite nicely.
AO3: Record ideas, observations
and insights relevant to intentions, reflecting critically on work and
progress.
My intentions for this shoot 2 of circles and curves was to be more creative with my original idea. I have used different colours in this shoot which was another focus of mine however I don't feel as if I have been anymore creative with my main idea. I did shoot in the studio which has made my photos a lot better, as the background is actually white, which has made things look better and much easier when editing my photos. To reach my focus of being more creative with the spots, I am going to create an image with them. To further develop my idea I plan to research the artist Roy Lichtenstein who uses spots to create images.
My intentions for this shoot 2 of circles and curves was to be more creative with my original idea. I have used different colours in this shoot which was another focus of mine however I don't feel as if I have been anymore creative with my main idea. I did shoot in the studio which has made my photos a lot better, as the background is actually white, which has made things look better and much easier when editing my photos. To reach my focus of being more creative with the spots, I am going to create an image with them. To further develop my idea I plan to research the artist Roy Lichtenstein who uses spots to create images.
AO2: Explore and select
appropriate resources, media, materials, techniques and processes, reviewing
and refining ideas as work develops.
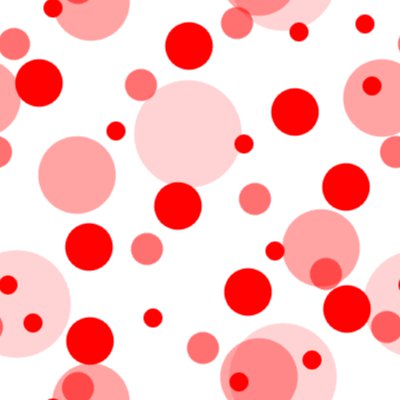
In my images I wanted as much negative space as I could in order to further develop my images in photoshop. I am doing this by adding more polka dots as the background, matching the colours and keeping the theme just as Yayoi does in her pieces.

In my images I wanted as much negative space as I could in order to further develop my images in photoshop. I am doing this by adding more polka dots as the background, matching the colours and keeping the theme just as Yayoi does in her pieces.

In this image I have created a polka dot background using the negative space that I had purposely left. To create this I used the elliptical marquee tool while using the multiple selection option to place all my shapes in the desired area. I used different layers for different colours, this made cleaning up mistakes a lot easier. To improve my image I would love to have a better proportion of circle sizes and colours, also better shaped circles.


AO1: Develop ideas through sustained and
focused investigations informed by contextual and other sources, demonstrating
analytical and critical understanding.
By further researching into Yayoi, I discovered that shes also used different items in her exhibits; For example one of her exhibits was entirely made of flowers. This has made me think about the different medias I could use to draw my spots, and this will helpfully help to progress and experiment in my future shoots. I could use spot stickers or make up to present my spots.
By further researching into Yayoi, I discovered that shes also used different items in her exhibits; For example one of her exhibits was entirely made of flowers. This has made me think about the different medias I could use to draw my spots, and this will helpfully help to progress and experiment in my future shoots. I could use spot stickers or make up to present my spots.
AO4: Present a personal and
meaningful response that realises intentions and, where appropriate, makes
connections between visual and other elements.
No comments:
Post a Comment